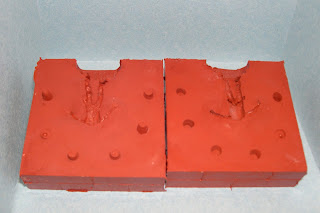
Now, gently prise the two mould halves apart with your hands. Sometimes they stick together a bit, but if you work round the corners, it will gradually peel apart. Remove the figure and the wooden block. In this case our lad has survived with no significant injury, which is good news, as if this mould doesn't work, I can always use him to make another.
At this stage the Mould will look something like this.

The wooden block attached to the figure base has formed a void in the mould which will be the hole into which we pour the metal, this will therefore be the "top" of the mould. Now with this in mind, visualise what will happen to the air in the mould
as the liquid metal is poured in. In this case you can see, that due to the orientation of the arms, air will become trapped in this part of the mould, as it fills with metal. The result will be that the arms won't cast properly as eventually the air compressed within them will prevent the flow of the metal (remember we aren't using a centrifuge to "force" the metal in, just gravity).

The solution to this issue is to "vent" the mould by cutting channels in the rubber to allow this air to escape. For this figure, one vent per arm will be sufficient. In the adjacent photo, I have created these vents, using a sharp modelling knife. Be careful whilst doing this not to cut into the detail of the figure, or you will destroy it when its cast. Also try to vent from the highest point, to make sure all the air can get out.
Having done this, the mould is now ready for casting! I won't cover this in detail as its fairly straightforward, but will give a brief summary next time.

Whilst waiting for the mould to set, I've completed the various weapons and drum, which will be required for the final masters. Here they are embedded in the plasticine, ready to be made into a mould themselves.
Next time we'll see how well this first figure mould works. I think it will, but suspect that it will probably fail after a while, due to the heavy undercut. Hopefully, before this happens, I'll have enough castings to make into final masters!
4 comments:
Hello John,
This is really great material. Thank you so much! I'm waiting with baited breath to see how the master turns out when you pour metal into your mold. Cross your fingers!
Best Regards,
Stokes
I like the fact that you are including tidbits like the venting. It's something you hear about if you do enough research on mold-making and casting minis, but you make it nice and clear with good examples and the why, where and how.
Thanks!
Yes, I agree with both previous comments. This is good stuff!
-- Jeff
Guy's,
Thanks for the positive comments, again, happy to answer any queries if I can, although my knowledge is somewhat limited.
Got some casts out of the mould, so were still on track for some final masters!
Cheers
John
Post a Comment