Monday, 28 January 2008

Casting

Ok, I don't intend to cover casting in a lot of detail, firstly because I don't have any photo's (its hard to handle hot metal safely and take good photo's), and secondly because its more than adequately covered elsewhere. If you want to know more detail try the Prince August site (I've added a link) which may also be useful to you if you need to buy some of the equipment and metal you'll need.

My tips would be:

1. Think about safety, you're dealing with hot metal at 200-300 degrees, so be careful (eye protection, clamp or vice for mould etc)!

2. The mould won't work well when cold, the metal cools too quickly and you don't get the detail, some people heat the mould up first in an Oven, I haven't tried this (as I don't think my wife and kids would like it!) so can't vouch for its effectiveness. I just accept that the first few casts won't come out well, and effectively use them to get the mould up to temperature.

3. Metal temperature is critical, too cold and the detail won't cast, too hot and you get "pitting" which will give a rough surface on the figure. Its largely a case of trial and error to get it correct, my tip would be stick a matchstick in the metal for about a second, if it comes out smouldering and a bit charred, you're in the right area.

4. Talc dusted in the mould is essential, prior to casting. I just use cheap un-perfumed stuff from the supermarket and it works fine, sprinkle it over, blow off the excess and away you go. One dusting will last for a number of casts.

5. Once you get the correct temperature etc and the mould is casting well, stick with it, as its likely that each cast after this point will be successful.

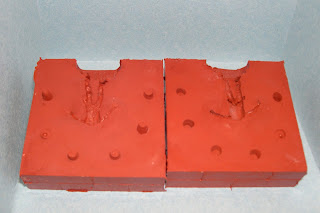
So how did we get on with our mould, well....... mixed results, I did get it casting effectively, and got about a dozen or so usable casts out, the mould has however started to break up a bit in the area around the legs/ turnbacks as expected, its not critical, as its not an area where I'm losing detail, just means the figures require a bit more cleaning up.

In normal terms this is a pretty poor performance for a mould of this type, I have several that have happily cast 100+ times and are still ok. However as I highlighted a little while back, this figure did have "problems" and as such I'm happy that the mould has served its purpose and for the time being I have sufficient castings to create final masters. If I need more I'll consider making another mould.

Recognising this defect in the design, I'll be "beefing up" this section of the figure to try to eliminate this issue for the future. As I said in an earlier post, the sculpt has to be a compromise to some extent between realism and practicality of casting etc. In this case I've danced a little to close to the realism side and will need to step back a little to get a more robust end product.


Anyway here's a shot of three of the casts cleaned up and ready to be made into final masters. I've also now completed the mould for the weapons and am currently working on the mould for the heads. These should be ready soon, I will then cast up some weapons and heads, and we can then press on to actually make some completed masters.

Back once I've cast these bits...............
Saturday, 26 January 2008

Finishing the Mould

Ok, so the second half of the Mould has now set. I now remove all the lego blocks from the outside, and in addition for this mould, withdraw the two plastic rods I had inserted to vent the turnbacks/coat. The mould will probably be a little "hairy" with little slivers of rubber on the outside, where it has leaked between the lego blocks. It doesn't make any difference to the function of the mould, but I usually trim this off with a knife at this stage.

Now, gently prise the two mould halves apart with your hands. Sometimes they stick together a bit, but if you work round the corners, it will gradually peel apart. Remove the figure and the wooden block. In this case our lad has survived with no significant injury, which is good news, as if this mould doesn't work, I can always use him to make another.

At this stage the Mould will look something like this.


The wooden block attached to the figure base has formed a void in the mould which will be the hole into which we pour the metal, this will therefore be the "top" of the mould. Now with this in mind, visualise what will happen to the air in the mould
as the liquid metal is poured in. In this case you can see, that due to the orientation of the arms, air will become trapped in this part of the mould, as it fills with metal. The result will be that the arms won't cast properly as eventually the air compressed within them will prevent the flow of the metal (remember we aren't using a centrifuge to "force" the metal in, just gravity).


The solution to this issue is to "vent" the mould by cutting channels in the rubber to allow this air to escape. For this figure, one vent per arm will be sufficient. In the adjacent photo, I have created these vents, using a sharp modelling knife. Be careful whilst doing this not to cut into the detail of the figure, or you will destroy it when its cast. Also try to vent from the highest point, to make sure all the air can get out.

Having done this, the mould is now ready for casting! I won't cover this in detail as its fairly straightforward, but will give a brief summary next time.


Whilst waiting for the mould to set, I've completed the various weapons and drum, which will be required for the final masters. Here they are embedded in the plasticine, ready to be made into a mould themselves.

Next time we'll see how well this first figure mould works. I think it will, but suspect that it will probably fail after a while, due to the heavy undercut. Hopefully, before this happens, I'll have enough castings to make into final masters!

Thursday, 24 January 2008

The other half

With apologies for the slight delay in update.

Once the first part of the mould has set (leave for at least 24hrs), we can press on. To do this, we flip the mould over, so that the wooden base is on the top. Gently remove the wooden base (it will come off will a little persuasion), in most cases the bulk of the plasticine will come off along with the wood. It doesn't matter however if it remains in the mould.

With the wooden base removed, take off the first two layers of lego bricks, this will bring you down to the level of the rubber which has now set. Having done this, remove any surplus plasticine which may still be stuck to the rubber or figure. Normally the bulk of the plasticine will just "peel off" but you might get the odd bit still stuck on. Use the sculpting tools to remove any residual.


In this photo, I've reached this stage, with the figure and mould "cleaned up" having removed any plasticine that was left. The mould box now needs to have the lego walls built back up ready to pour the second half.

As this is a "drop casting" mould, i.e. it will rely on Gravity to fill it, it will require to be "vented" to allow the air to flow out as the metal flows in. In most circumstances, the cutting of vents can be left until both halves of the mould are complete. Indeed for this mould I will be doing this and will illustrate this process in due course.


However as I've already highlighted, this mould has a slight "problem" namely the coat tails and turnbacks. This part of the figure will effectively be "buried" in one half of the mould. As such it will be quite difficult to cut vents to this part of the casting when the mould has been made. There's a real risk you could damage some of the detail in doing so. I have therefore very lightly glued a couple of plastic rods to the very highest point on the end of the coat tails. The rods are then laid on the outside edge of the mould. I will now pour the second half of the mould, and once set, will withdraw these rods, thus creating an air vent to this part of the figure (at least that's the theory!)

Before pouring the second half of the mould, I will again spray the surface and figure with "releasing agent". The rest of the process is exactly the same as previously detailed for the first half. You will need to mix up about 100g of rubber again.

Next time, finishing the mould.

Sunday, 20 January 2008

Pouring the Mould

I've now built up the remaining sides of the Mould box, to the desired height. I have then sprayed the inside of the box and the figure and plasticine with "formula 5" release agent, I find this helps when later separating the mould.


The moulds I'm going to make are made of Room Temperature Vulcanising rubber (RTV). The rubber comes in a thick liquid form (similar to treacle). You decant the required quantity into a small mixing tub/bowl and add drops off a catalyst which starts the reaction off. Depending on how much catalyst you add, it takes about 24hrs to set.

I'm using RTV 101 from Alec Tiranti's in the UK. The link is at the side of the Blog. The more you buy the cheaper it is, however for a mould this size (which will use about 200g of rubber in total) it will cost about £4-5 per mould.

For this first half of the mould I've mixed up about 100g of rubber with the required catalyst, make sure you mix well to ensure that the reaction works. Once mixed, I often leave it to sit for a couple of minutes, as it tends to get small air bubbles trapped in it from the mixing process which need time to work themselves out.

Ok were ready to encase our lad in his rubbery grave! hopefully an experience which he will survive.


Initially dribble a small amount of the rubber mixture over the figure and other points of detail, don't put too much on at this stage, and don't touch the surface, as this tends to make it stick. Once a light covering has been achieved, stop for a couple of minutes, to allow the rubber to spread. Again this is to try to prevent air bubbles forming on the surface of the mould.


Now pour the rest of the rubber, try to pour steadily into one corner, allowing the rubber to flow out across the box, this should prevent bubbles forming. Keep going till you've filled the box up or run out of rubber, which with about 100g should be about the same point, hopefully!

The mould now needs to be laid aside to set for 24hrs. Don't be tempted to take it apart prior to this, go and do something else, I'm off to finish that drum.

Next time, the "other half" of the Mould!

Saturday, 19 January 2008

Mould Box

I'm going to be making moulds for drop casting these masters, its a process you can do at home, without the use of a centrifuge.


The first thing you will need to make such Moulds, is a Mould Box. The base of mine is made up of a couple of pieces of plywood about 7-8mm thick. The larger section on the base is about 9.5cm square, with a smaller piece on top of this about 6.5cm square. On top of this is some modelling putty (Plasticine), this will be used to form the "bed" for the miniature.


For the sides of the Mould Box, I'd recommend Lego, its ideal as it is sufficiently "watertight" when constructed to hold the liquid rubber of the mould, before its set, but also very flexible enabling you to remove and adjust in height etc. Dig some out of the loft if you have any, if not, you can buy small quantities on ebay for a few pounds.

For a 25mm foot figure, which this mould box is made for, its a 12x12 lego box, which will have 4 layers. This size works well in my experience for this size of figure.

In this photo I have added the first two layers of side walls of lego and smoothed out the plasticine to this level, this is effectively half of the mould.

We now need to bed the miniature into the material, this is a tricky process to get right, to some extent its trial and error, and with practice, you'll get a feel for it. I'll use the same tools to do this as I used for sculpting, also using a light smear of Petroleum Jelly (vaseline) on them to stop sticking and for smoothing the surface. Roughly you want about half the figure embedded in the material, but you must follow some basic rules:

1. Don't lock bits of the figure in, if you completely enclose an arm or leg say in one half of the mould, how will it subsequently come out?

2. Try to avoid rapid changes in height or thickness on each mould half, if you do have such areas, they will be weaknesses in the mould and vulnerable to "tearing out" or failure, ruining your mould and any subsequent castings.

3. Try to get a nice clean hard edge between the figure and the plasticine, roughly flat and level. Its worth spending a bit of time on this going round the figure carefully. Do this bit well, and the mould will last a long time, and you'll have little or no flash or mould lines.

4. Ultimately you want a line of mould running around the figure, up and down each leg etc, it therefore won't be a level mould in the centre, it will gently undulate round the figure, however bring the edges of the mould back to the same height by the time you get to the edges, as you do want each half to be roughly even overall.

5. Try to avoid areas where one half of the mould "cuts back on itself" i.e. a big undercut, this is for the same reason as 1. its an area that's likely to fail when the mould is in use, and also may make it hard to get the figure out, once cast. In this example, I have broken this rule, at least to some extent, as the turnbacks of the coat, will suffer this problem. Hopefully it won't ruin the mould, but it's possible, let's hope it works out!


I've carried this process out with the basic armature in this photo. You'll note that I've added a small wooden block to the base (this will be the opening down which the metal will be poured). I've also made some holes or dents in the plasticine around the mould, these will act as locating plugs for the two mould halves (one male one female). Note in regard to this I have not put any in the bottom quarter of the mould. We need to leave this clear to cut out vent channels etc when the mould has been made.

Its now ready to have the rest of the lego bricks built up, and the mould poured. We'll do this next time.

Ready to cast

Well, progress has been a little delayed in recent days, as a heavy cold has delayed things. However, on the mend now and things are back on track.


I've finished the three heads I intend to use initially, Fusilier, Grenadier and an officer. They've been removed from the paper clips, I was using as a stand and are now ready for casting.

A lot of what I've been doing to date in this process is preparatory, making various components required to make final masters. This element of the process is a bit dull, but it is an essential step. I have a few bits and bobs left to complete, in regard to this, a drum, officers fusil and a pistol. These are about half done, and should be completed in the next few days to draw this element of the process to an end, hurrah!


To keep my interest up, I've temporarily stuck the grenadier head on the body I prepared earlier, this gives us a good idea how the finished master will look, and is a good check to see that things are looking ok. I'm happy with the overall look of the figure so far, although its clearly not finished yet.

Next post, I'll cover making the Moulds and subsequent casting of the various bits I've created to date.

Tuesday, 15 January 2008

Keep your hair on!

I've now progressed a couple of heads further, the basic fusilier and the grenadier.


This has been done in a couple of stages, first the basic form, for the fusilier this was the tricorne, moving towards a bicorne by this period (which personally I find quite hard to do). The grenadier got a structure upon which to build the bearskin, along with the front plate. The front plate was embossed with devices, but at this scale (don't let the close up photo's deceive you, the plate is only about 2.5mm in height) and with my talents, your joking! So I've roughened it up a bit to "suggest" this detail, this should give a sufficient surface to paint on to give a reasonable impression of this feature. These were then both left to set.


I then added the cockade for the fusilier along with his hair, so that head is now ready. The grenadier has had the fur and bag added to the bearskin, he will still need hair and a cockade and plume, but I've left these off until what has been done has set.


I note that a couple of you are considering having a go yourselves, great! My advice would be take your time, aim to do small bits in a session (remember the greenstuff is only really workable for a couple of hours, so mix up small quantities) build up in a series of layers, letting each one harden, as I'm illustrating here. That way you can "bank" the bits you get right, and if it goes wrong you don't ruin all that you've done prior to that. The key discipline to stick to is when you've completed a sculpting session, decide whether your happy with what you've added, if your not, take it off, while you still can, you can always try again as long as you don't let it set! You will improve with practice.

More heads next time.

Monday, 14 January 2008

Heads up!

Started work on the heads, after all we wouldn't want our chap to look like a principal character from sleepy hollow.

The technique I use is to drill a hole in both the body of the armature and in the removed head. To do this I use a small hand twist trill with bits ranging from 0.5 up to 1.0mm. I can then mount the head onto the body by inserting a short pin to join the two together (whilst working on them the heads can be stuck to a longer peg, or as here to a bent paperclip, which makes a good stand). The neck can then be completed accordingly and the cast made. The advantage of this approach is that I can use both heads and bodies subsequently in other combinations, with only slight alteration/repair to the joint at the neck on removal. I'll illustrate this technique in due course.


One of the advantages of using this type of armature is that they already have a fairly good face on the to start with. This is great as its a really hard thing to do well. In my experience, and its only personal taste, the nose is a little "weak" and needs to be beefed up a bit or its lost in the cast figure. In this photo I've added more material to all three heads on the nose. One head is going to be for a grenadier, so I've added a suitably outrageous moustache, and another is going to be an officer so I've opened the mouth a little and dropped the jawline accordingly (Officers like to think their in charge).

In the next few days I'll build these heads up further by adding tricornes, bearskin and hair.


I've also now completed the musket and grenadiers hanger, I think I'll do a few more items to go along with these, probably a pistol, officers sword and possibly a light officers fusil. The muskets not bad, perhaps a little thicker than it would be in real life, but it needs to be or it wouldn't be robust enough for use on the table. I've modelled with the sling "tightened up", suitable for a marching figure. This bit can be cut off if required and re-modeled for other poses.

Anyway, touch of cold at present so progress slightly delayed, more on head development in next few posts.

Thursday, 10 January 2008

Making Progress ..... and moving back

Firstly thanks for the positive comments. Its been correctly pointed out that it would be helpful if I assume people reading the Blog know nothing about the subject area (which isn't a lot less than me!). So to that end I'll firstly reprise a few things.


The armatures as previously indicated are from Ebob (the link's at the side of the Blog). Here's one of the fine fellows to give you an idea where our brave lad started from.


The tools being used are stainless steel Dentistry items, here's a selection. I'm sculpting using Greenstuff, which is a two part epoxy? material that comes in strips half blue half yellow. You mix it together and it goes green hence.......greenstuff. I think its actually supposed to be used in the plumbing industry, but its fairly extensively used in the miniatures world hence the term "greens" for masters.

All the tools, greenstuff and armatures are available from Ebob, from the link on this blog (I'll point out now I have no commercial interest in Ebob, just trying to point people in the right direction if required).

When mixed it has the consistency of chewing gum, and stays pliable for about 1-2hrs after that its best to stop. When working with it I find it useful to occasionally wipe the sculpting tools with petroleum jelly (vaseline) as it prevents them sticking to the material. Its also handy to use tools thus treated for polishing up rougher surfaces of the greenstuff, when its still pliable that is.

Right, hope that's covered the basics, but feel free to ask anything else, and I'll try to give you an answer.

One of the things I should say, is that with a figure 25mm tall you can't have entirely lifelike detail, its a compromise between the overall form and how it will look when painted etc. To that end with this figure, what I'll be trying to do is give a reasonably good impression of what the uniform should look like, which will hopefully carry through this impression to the painted figure.

In the case of this lad, I've put on Buttons (which are a bit oversize) to give hopefully the feel and look of the uniform. Its not however the correct number in respect to true accuracy but I think it will look ok, as I said a compromise.

In respect to this, I've decided not to put buttons on the side of the gaiters, as I think this would just be a bit to much and would destroy the overall line of the figure, if required they can be painted on.


So here he is, not much changed from previously other than I've fixed that damaged button (only noticed when I saw the Photo on the Blog) and fixed his arm back on. In that respect I've put a very small amount of material on the joint to strengthen it a little. We don't want to overdo this as we still want to be able to bend the arm later at this point.

I want to create several different master figures, all wearing the same basic coat like this lad. Given this, now is probably a good point to stop the sculpting process again, and cast this figure up thus making another armature wearing the coat and gaiters. This armature can then be used in several applications to create final masters by adding different heads, equipment etc.

So the next stage for this chap will be to make a mould and cast him up as is. I'll cover this in the next few posts.

This "intermediate casting" is a bit risky in that its possible the mould won't work, the figure gets damaged or too much detail is lost, but its a necessary step if we don't want to have to sculpt all figures individually up from scratch. On this figure I'm particularly concerned about the long coat tails, which are realistic but a bit vulnerable (its a big "undercut" for the Mould to handle)........We'll just have to hope for the best!

In the interim our brave lad will need to get "tooled up" or he won't be able to storm to glory on the battlefield, so lets make some weapons!


I'm making initially a sword and Musket, these will be loosely (and I do mean loosely, its 25mm after all!) on a French Grenadiers hanger and the 1763 model musket.

The frames for these are nothing more than appropriately bent paper clips, flattened in the case of the sword. The sword has also had a little bit of plastic strip added to form the hilt. I've then started to build these up with Greenstuff, but I'll now need to stop and wait for it to set before I add more detail.

I think that's enough for now................hopefully back again soon for another step in the process!

Wednesday, 9 January 2008

Sculpting ........ Getting Started

To make a miniature, the first thing you will need is a "dolly" or armature. This will act as the Skeleton for the figure, giving you something to build on and also importantly setting the proportions for the figure. You can make these yourself, out of bits of wire, or take the easier route, which I use and buy some. I would recommend the ones supplied by Ebob, and it is those that I have used here.


The figures I going to make are late Eighteenth Century French, suitable for the AWI as its a range not really available from anybody in a style which I like.

If you think you might make more than one pose or figure its worth creating some basic masters, at various stages in the process, that can then be added to or modified to create finished masters for casting. You'll often see this approach being used by the "professionals" when they show previews of greens.

In this case I've created a couple of poses and clad then in a basic C18th style waistcoat, breeches and shoes. You'll note no head at this stage (its been removed for seperate surgery!).


I've sculpted this using "greenstuff" and basic modelling tools, I think there made for Dentistry work, but are readily available.

At this point in the process I will make casts of these as I plan to use this basic form in several different applications in due course. I'll come back to casting later, we'll stick with scuplting at present.


We've now effectively created a new more advanced "dolly" (not cleaned up in this Photo) on which we can build a figure.


Lets add a coat, this will be done in a couple of stages, first the basic form which will be allowed to harden, then the detail such as lapels, turnbacks, buttons etc will be added. In the later Photo's I've also started to add the gaiters.


You'll also note the arm has broken off, this doesn't matter at this stage. It happens quite often, and we can fix it later.

More to follow ........

In the Beginning..........

When I first started buying miniatures in the 80's the "big" Sculpters were the likes of Peter Gilder and the figures were of the slim realistic style. Over the years I dipped in and out of the hobby and the increasing emphasis on more cast detail and the resultant "Chunkier" figures gradually crept up on me without much notice. I bought and enjoyed them the same as everyone else.

A couple of years ago a long term gameing pal of mine and I decided to revist the AWI in 25mm, a period we enjoyably played as lads during the 1980's. On a nostalgia trip we flicked through some of our old books, particularly the inspirational Curt Johnson book "Battles of the American revolution" which contains some lovely set piece images using Gilder Hinchliffe figures.

Suitably enthused we embarked on recruiting troops, using this range and also the lovely RSM figures available from DPC in the states.

At this point we had a bit of a "road to Damascus" moment realising how horribly stylised modern miniatures had become, less a human form, more a "paint by numbers" structure to enable people to recreate the style of dare I say it more able painters. Don't get me wrong this form of miniature has allowed the bulk of those involved in the hobby to create miniatures which are more than presentable and give a very pleasing effect, using a fairly formulaic approach that's relatively easy to master (Black undercoat, layers of progressively lighter shades). In comparison older miniatures without the cast on detail are much harder to paint well and as such its easy to see how the paint by numbers boys have triumphed in the mass market.

Anyway enough of this as background, I'm sure what I said may have offended some, for which, my apologies, its not my intention to do so, more to set the scene for the blog.

One of the things you will find if you do decide to re-explore some of these older ranges is that some of the sculpting quality is variable (RSM are a good example as I'm pretty sure not all figures were done by Steve) and that many figures you might want are "missing". So whats the solution...........

Make your own!

No, its not as hard as you might first think, and I intend in this Blog to show you my limited attempts to do so to date. We'll start with sculpting and then move on to making moulds and casting in due course.